近年、シングルページアプリケーション(SPA)が普及してきました。 SPAとは、たった1つのページで構成されたウェブサイトのことです。 その1つのページは、JavaScriptアプリケーションのコンテナとして機能します。 JavaScriptは、コンテンツを取得し、コンテナ内でレンダリングする役割を担っています。 コンテンツは通常、ウェブサービスから取得しますが、多くの場面でRESTful APIが採用されています。 SPAを構成するアプリケーションの部分は、一般的にクライアントまたはフロントエンドと呼ばれ、REST APIを担当する部分は、サーバーまたはバックエンドと呼ばれます。 このチュートリアルでは、NodeとExpressをベースにした、RESTバックエンドを備えたシンプルなAngularシングルページアプリを開発します。 データが動的に入力され、データが変更されると自動的に更新されるHTMLテンプレートを簡単に作成することができます。
サーバーには、Node with Expressを使用します。 ExpressはREST APIを簡単に作成できるフレームワークで、サーバー上のさまざまなリクエストに対して実行するコードを定義することができます。 追加のサービスをグローバルに、またはリクエストに応じてプラグインすることができます。 Expressの上に構築され、データベースモデルをAPIに変換する作業を自動化するフレームワークは数多くあります。
Angularでは、TypeScriptの使用を推奨しています。 TypeScriptはJavaScriptに型付け情報を追加するもので、私の意見では、JavaScriptで大規模なアプリケーションを開発する際の未来の姿だと思います。
クライアントとサーバーに使用するライブラリは次のとおりです。
- Angular。
- Angular: クライアントアプリケーションの構築に使用するフレームワーク
- Okta for Authorisation: シングルサインオン認証を管理するプラグイン。 クライアントとサーバーの両方でOktaを使ったシングルサインオン認証を管理するプラグイン
- Angular Material: すぐに使えるMaterial Designを提供するAngularプラグイン
- Node: JavaScriptコードを実行する実際のサーバー
- Express: サーバーリクエストに応答し、REST APIを構築するためのルーティングライブラリ
- TypeORM: A database ORM library for TypeScript
Start Your Basic Angular Client Application
早速、Angularを使って基本的なクライアントを実装してみましょう。 目標は、商品、その価格、在庫数を管理できる商品カタログを開発することです。 このセクションの最後には、トップバーと2つのビュー「Home」と「Products」からなる、シンプルなアプリケーションができあがります。 商品」ビューにはまだ何もコンテンツがなく、パスワードもかかっていません。
まず、Angularをインストールする必要があります。 ここでは、すでにシステムにNodeがインストールされていることを前提とし、
npmコマンドを使用します。 ターミナルに以下のコマンドを入力します。npm install -g @angular/[email protected]システムによっては、パッケージをグローバルにインストールするため、
sudoangular-cliパッケージは、Angularアプリケーションの管理に使用されるngコマンドを提供します。ng new MyAngularClientAngular 7を使用すると、2つのクエリが表示されます。 1つ目は、ルーティングを含めるかどうかを聞いてきます。 これには「はい」と答えます。 2つ目のクエリは、使用したいスタイルシートの種類に関するものです。
ng newMyAngularClientsrcindex.htmlstyle.cssというファイルがあります。 このファイルには、アプリケーション全体に適用されるグローバルスタイルシートが含まれています。app-routing.module.tsapp.component.cssapp.component.htmlapp.component.tsapp.component.spec.tsapp.module.tsこれらのファイルは、
index.htmlに挿入されるメインのアプリケーション コンポーネントを定義しています。-
app.component.cssappコンポーネントのスタイルシートが含まれています。 スタイルは各コンポーネントに対してローカルに定義することができます -
app.component.htmlコンポーネントの HTML テンプレートが含まれています -
app.component.tsファイルにはビューを制御するコードが含まれています -
app.module.tsアプリがどのモジュールを使用するかを定義します。 -
app-routing.module.tsは、アプリケーションのルートを定義するために設定されています -
app.component.spec.tsappコンポーネントをユニットテストするためのスケルトンを含んでいます
このチュートリアルでは、テストについては説明しません。 しかし、実際のアプリケーションでは、この機能を利用する必要があります。 チュートリアルを始める前に、いくつかのパッケージをインストールする必要があります。 これらのパッケージを使えば、きれいにデザインされたレスポンシブレイアウトを素早く作成することができます。 クライアントのベースディレクトリである
MyAngularClientに移動し、次のコマンドを入力します。npm i @angular/[email protected] @angular/[email protected] @angular/[email protected] @angular/[email protected]@angular/material@angular/cdkのライブラリは、GoogleのMaterial Designに基づいたコンポーネントを提供しています。@angular/animations@angular/flex-layoutは、デザインをレスポンシブにするためのツールを提供します。次に、
appコンポーネントのHTMLテンプレートを作成します。src/app/app.component.htmlを開き、コンテンツを以下のように置き換えます。<mat-toolbar color="primary" class="expanded-toolbar"> <button mat-button routerLink="/">{{title}}</button> <div fxLayout="row" fxShow="false" fxShow.gt-sm> <button mat-button routerLink="/"><mat-icon>home</mat-icon></button> <button mat-button routerLink="/products">Products</button> <button mat-button *ngIf="!isAuthenticated" (click)="login()"> Login </button> <button mat-button *ngIf="isAuthenticated" (click)="logout()"> Logout </button> </div> <button mat-button ="menu" fxHide="false" fxHide.gt-sm> <mat-icon>menu</mat-icon> </button></mat-toolbar><mat-menu x-position="before" #menu="matMenu"> <button mat-menu-item routerLink="/"><mat-icon>home</mat-icon> Home</button> <button mat-menu-item routerLink="/products">Products</button>; <button mat-menu-item *ngIf="!isAuthenticated" (click)="login()"> Login </button> <button mat-menu-item *ngIf="isAuthenticated" (click)="logout()"> Logout </button></mat-menu><router-outlet></router-outlet>mat-toolbarrouter-outletはルーターで埋められるコンテナになります。app.component.tsファイルは、次のように編集します。import { Component } from '@angular/core';@Component({ selector: 'app-root', templateUrl: './app.component.html', styleUrls: })export class AppComponent { public title = 'My Angular App'; public isAuthenticated: boolean; constructor() { this.isAuthenticated = false; } login() { } logout() { }}これは、
appisAuthenticatedloginlogoutという2つのメソッドが含まれているのがわかります。 現時点では、これらは何もしていません。 これらは、Oktaによるユーザー認証を扱う次のセクションで実装されます。 次に、使用するすべてのモジュールを定義します。app.module.tsの内容を以下のコードで置き換えてください:import { BrowserModule } from '@angular/platform-browser';import { NgModule } from '@angular/core';import { BrowserAnimationsModule } from '@angular/platform-browser/animations';import { FlexLayoutModule } from '@angular/flex-layout';import { MatButtonModule, MatDividerModule, MatIconModule, MatMenuModule, MatProgressSpinnerModule, MatTableModule, MatToolbarModule} from '@angular/material';import { HttpClientModule } from '@angular/common/http';import { FormsModule } from '@angular/forms';import { AppRoutingModule } from './app-routing.module';import { AppComponent } from './app.component';@NgModule({ declarations: , imports: , providers: , bootstrap: })export class AppModule { }すべてのマテリアルデザインモジュールに注目してください。
@angular/materialライブラリでは、アプリで使用したいコンポーネントの種類ごとにモジュールをインポートする必要があります。 Angular 7からは、デフォルトのアプリケーションのスケルトンには、app-routing.module.tsという別のファイルが含まれています。import { NgModule } from '@angular/core';import { Routes, RouterModule } from '@angular/router';import { ProductsComponent } from './products/products.component';import { HomeComponent } from './home/home.component';const routes: Routes = ;@NgModule({ imports: , exports: })export class AppRoutingModule { }これは、ルートのパスと
productsHomeComponentProductsComponentを接続します。 これらのコンポーネントを今すぐ作成します。 Angularクライアントのベースディレクトリで、以下のコマンドを入力します。ng generate component Productsng generate component Homeこれで
htmlcsstsspec.tsapp.module.tshome.component.htmlsrc/app/homeを開き、以下の内容を貼り付けます。<div class="hero"> <div> <h1>Hello World</h1> <p class="lead">This is the homepage of your Angular app</p> </div></div>home.component.cssファイルにもスタイリングを入れておきます。.hero { text-align: center; height: 90vh; display: flex; flex-direction: column; justify-content: center; font-family: sans-serif;}とりあえず
ProductsComponentは空けておきましょう。 これは、バックエンドのRESTサーバーを作成して、データを入力できるようになってから実装します。 すべてを美しく見せるために、2つの小さな作業が残っています。 以下のスタイルをsrc/style.css@import "~@angular/material/prebuilt-themes/deeppurple-amber.css";body { margin: 0; font-family: sans-serif;}.expanded-toolbar { justify-content: space-between;}h1 { text-align: center;}最後に。 Material Design Iconsをレンダリングするために、
index.html<head>タグの中に1行追加します。<link href="https://fonts.googleapis.com/icon?family=Material+Icons" rel="stylesheet">これで、Angularサーバーを起動して、これまでの成果を確認する準備が整いました。 クライアントアプリのベースディレクトリで、次のコマンドを入力します。
ng serve次に、ブラウザを開き、
http://localhost:4200に移動します。Node + Angularアプリに認証を追加する
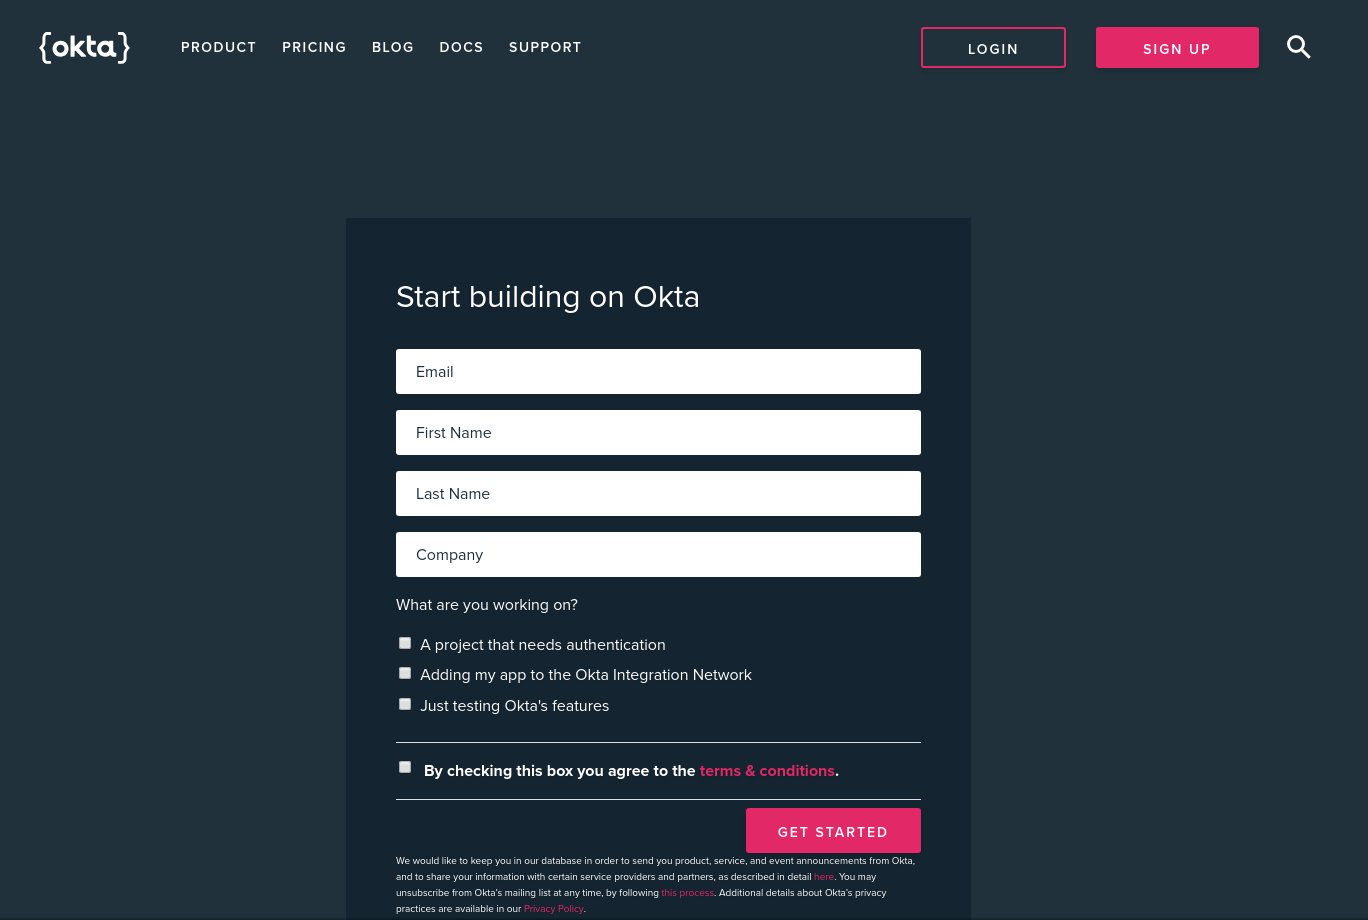
ウェブアプリケーションをゼロから開発したことがある人なら、ユーザーがアプリケーションに登録、検証、ログオン、ログアウトできるようにするだけで、どれだけの作業が必要かわかるでしょう。 Oktaを使えば、このプロセスを大幅に簡略化することができます。

ブラウザでdeveloper.okta.comに移動し、「無料アカウントの作成」をクリックします。
完了すると、開発者ダッシュボードが表示されます。
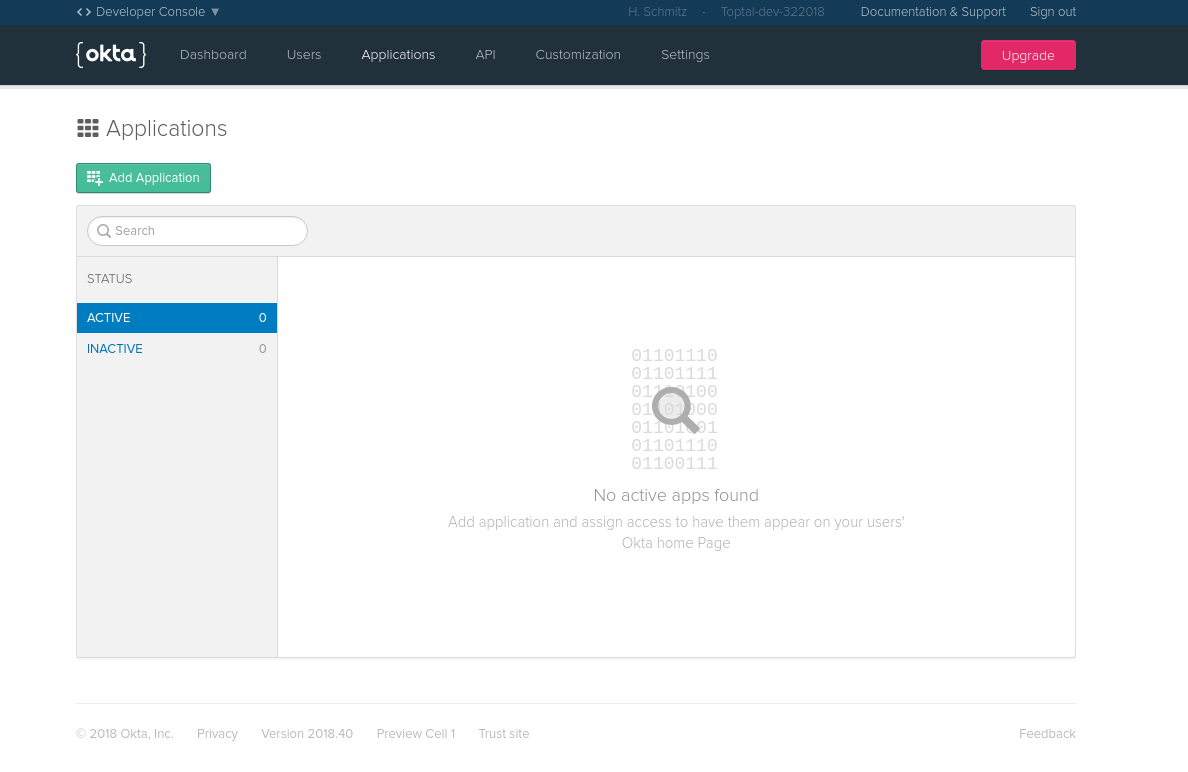
まず、新しいシングルページアプリケーションを作成します。 Single Page App」を選択し、「Next」をクリックします。

次のページでは、デフォルトの設定を編集する必要があります。 ポート番号が4200であることを確認します。
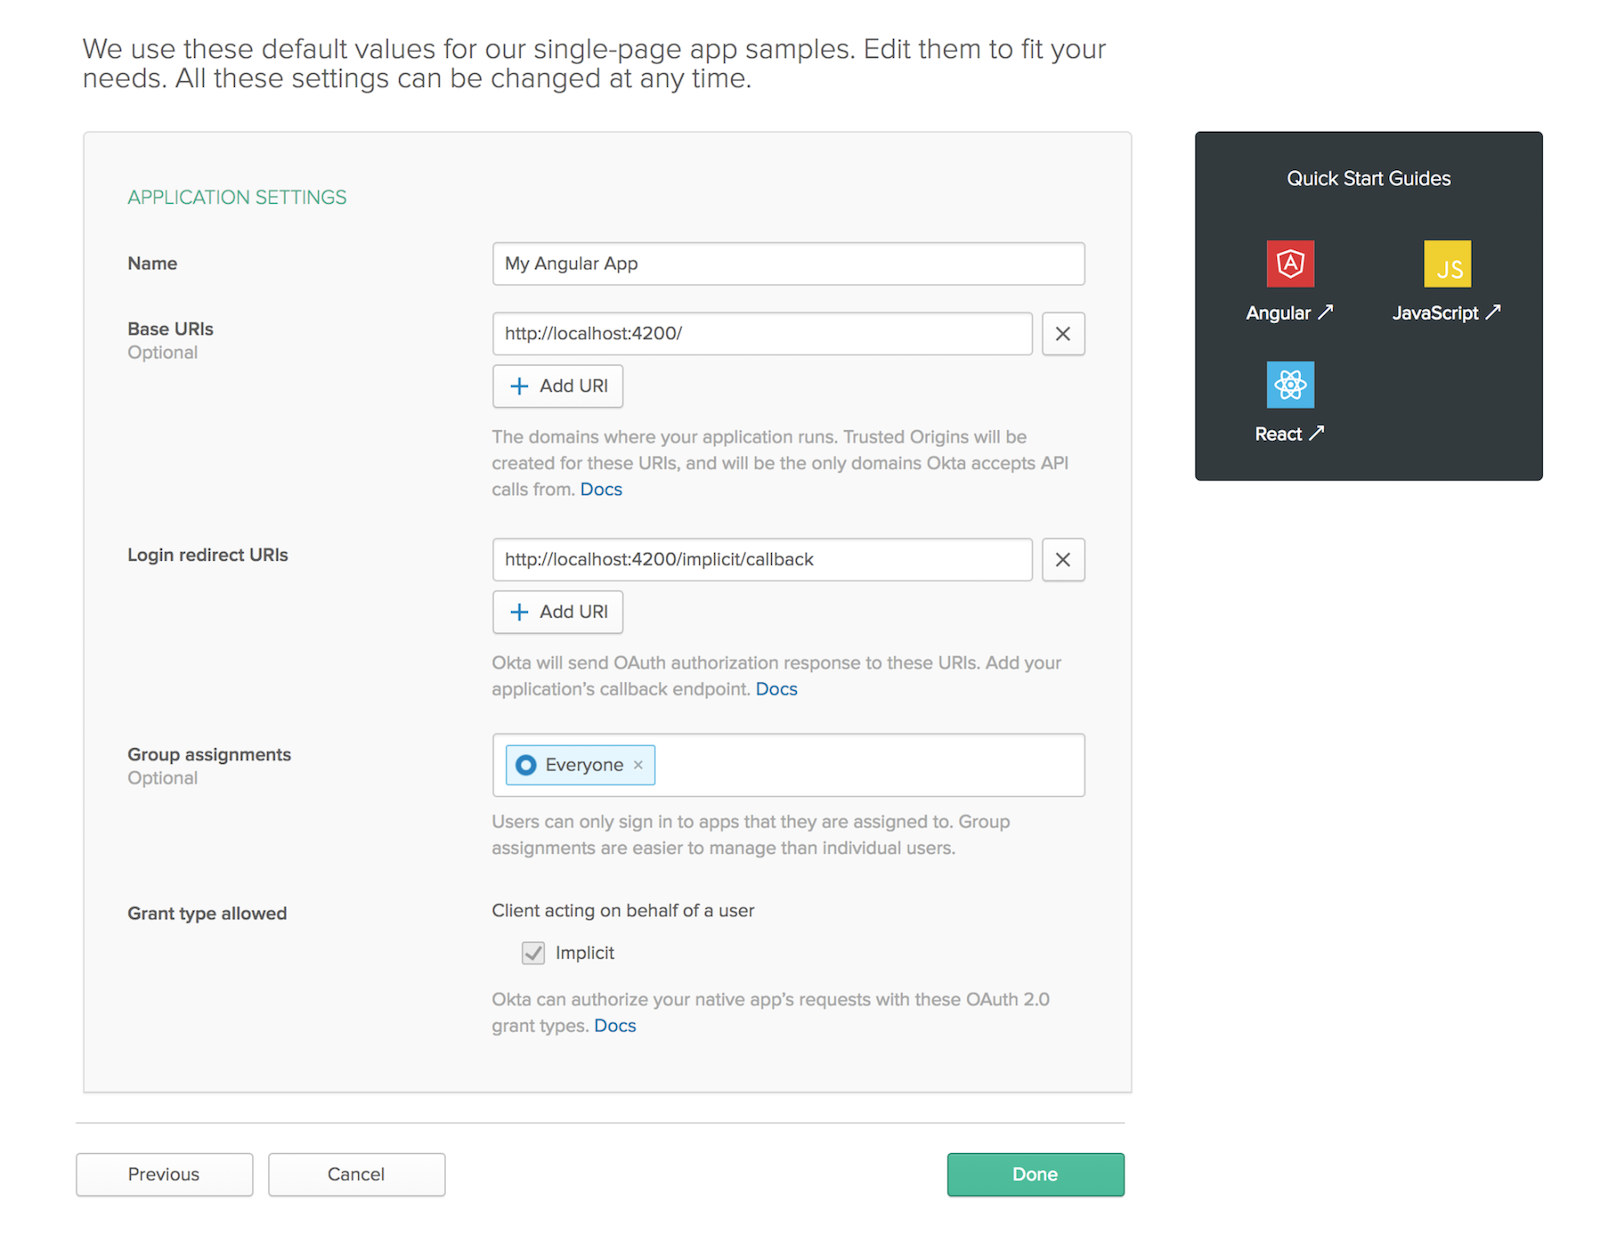
これで完了です。
クライアントに認証を実装するには、OktaのAngular用ライブラリをインストールします。
npm install @okta/[email protected] --save-exactapp.module.tsOktaAuthModuleをインポートします。import { OktaAuthModule } from '@okta/okta-angular';importsappモジュールを追加します。OktaAuthModule.initAuth({ issuer: 'https://{yourOktaDomain}/oauth2/default', redirectUri: 'http://localhost:4200/implicit/callback', clientId: '{YourClientId}'})ここでは、
yourOktaDomainを、Oktaダッシュボードに移動したときにブラウザに表示される開発ドメインに置き換えてください。YourClientIdは、アプリケーションの登録時に取得したクライアントIDに置き換える必要があります。 上記のコードは、Okta認証モジュールをあなたのアプリケーションで利用可能にします。app.component.tsで使用し、サービスをインポートします。import { OktaAuthService } from '@okta/okta-angular';コンストラクタを修正してサービスを注入し、それを購読します。
constructor(public oktaAuth: OktaAuthService) { this.oktaAuth.$authenticationState.subscribe( (isAuthenticated: boolean) => this.isAuthenticated = isAuthenticated );}これで、認証ステータスの変更が
isAuthenticatedngOnInitimplements OnInitをクラス定義に追加しますimport { Component, OnInit } from '@angular/core';...export class AppComponent implements OnInit { ... async ngOnInit() { this.isAuthenticated = await this.oktaAuth.isAuthenticated(); }}最後に。
loginlogoutのメソッドを実装して、ユーザーインターフェイスに反応して、ユーザーのログインやログアウトを行います。login() { this.oktaAuth.loginRedirect();}logout() { this.oktaAuth.logout('/');}ルーティングモジュールでは、ログインリクエストに使用するルートを登録する必要があります。
app-routing.module.tsOktaAuthGuardをインポートします。import { OktaCallbackComponent, OktaAuthGuard } from '@okta/okta-angular';routesの配列に別のルートを追加します。{ path: 'implicit/callback', component: OktaCallbackComponent}これにより、ユーザーは「ログイン」ボタンを使ってログインできるようになります。
Productsproductsルートに次の行を追加します。{ path: 'products', component: ProductsComponent, canActivate: }以上で完了です。 これで、ユーザーが Products ビューにアクセスしようとすると、Okta のログインページにリダイレクトされます。
Node REST APIの実装
次のステップでは、NodeとExpressをベースにして、製品情報を保存するサーバーを実装します。 これには、作業を容易にするためにいくつかの小さなライブラリを使用します。 TypeScriptで開発するには、
typescripttscが必要になります。 データベースの抽象化レイヤーには、TypeORMを使うことになります。 これは、TypeScriptクラスにビヘイビアを注入して、データベースモデルに変える便利なライブラリです。 サーバーアプリケーションを格納する新しいディレクトリを作成し、その中で以下のコマンドを実行します。npm initすべての質問に答えてから、実行してみてください。
npm install --save-exact [email protected] @types/[email protected] @okta/[email protected] [email protected] [email protected] [email protected] [email protected] [email protected] [email protected] @types/[email protected]これらのライブラリすべてを詳しく説明することはありませんが、
@okta/jwt-verifierがJSON Web Tokensの検証と認証に使用されていることがわかります。TypeScriptを動作させるために、
tsconfig.jsonというファイルを作成し、以下の内容を貼り付けます。{ "compilerOptions": { "target": "es6", "module": "commonjs", "outDir": "dist", "experimentalDecorators": true, "emitDecoratorMetadata": true }, "include": , "exclude": }サーバー作成の最初のステップは、製品のデータベースモデルを作成することです。 TypeORMを使えば、これは簡単です。
srcmodel.tsというファイルを作成します。 以下の内容を貼り付けます。import {Entity, PrimaryGeneratedColumn, Column, createConnection, Connection, Repository} from 'typeorm';@Entity()export class Product { @PrimaryGeneratedColumn() id: number; @Column() name: string; @Column() sku: string; @Column('text') description: string; @Column() price: number; @Column() stock: number;}TypeORMアノテーションは、クラス定義をデータベースモデルに変換します。 私がTypeORMプロジェクトを気に入っている理由は、その使いやすさと、サポートされているSQLおよびNoSQLデータベースコネクタの種類の多さです。 https://github.com/typeorm/typeormのドキュメントをチェックすることをお勧めします。
また、製品のリポジトリにアクセスする必要があります。
model.tsファイルにも次のように追加します。let connection:Connection;export async function getProductRepository(): Promise<Repository<Product>> { if (connection===undefined) { connection = await createConnection({ type: 'sqlite', database: 'myangularapp', synchronize: true, entities: , }); } return connection.getRepository(Product);}ここでは簡単にするためにSQLiteを使用していることに注意してください。
次に、
product.tsというファイルを作成します。import { NextFunction, Request, Response, Router } from 'express';import { getProductRepository, Product } from './model';export const router: Router = Router();router.get('/product', async function (req: Request, res: Response, next: NextFunction) { try { const repository = await getProductRepository(); const allProducts = await repository.find(); res.send(allProducts); } catch (err) { return next(err); }});router.get('/product/:id', async function (req: Request, res: Response, next: NextFunction) { try { const repository = await getProductRepository(); const product = await repository.find({id: req.params.id}); res.send(product); } catch (err) { return next(err); }});router.post('/product', async function (req: Request, res: Response, next: NextFunction) { try { const repository = await getProductRepository(); const product = new Product(); product.name = req.body.name; product.sku = req.body.sku; product.description = req.body.description; product.price = Number.parseFloat(req.body.price); product.stock = Number.parseInt(req.body.stock); const result = await repository.save(product); res.send(result); } catch (err) { return next(err); }});router.post('/product/:id', async function (req: Request, res: Response, next: NextFunction) { try { const repository = await getProductRepository(); const product = await repository.findOne({id: req.params.id}); product.name = req.body.name; product.sku = req.body.sku; product.description = req.body.description; product.price = Number.parseFloat(req.body.price); product.stock = Number.parseInt(req.body.stock); const result = await repository.save(product); res.send(result); } catch (err) { return next(err); }});router.delete('/product/:id', async function (req: Request, res: Response, next: NextFunction) { try { const repository = await getProductRepository(); await repository.delete({id: req.params.id}); res.send('OK'); } catch (err) { return next(err); }});このファイルはやや長いですが、特に驚くような内容ではありません。
Productオブジェクトが作成され、データベースに保存されたり、データベースから削除されたりします。再び認証に目を向けてみましょう。 認証されたユーザーだけがサービスにアクセスできるようにする必要があります。
auth.tsというファイルを作成し、以下のように貼り付けます。import { Request, Response, NextFunction} from 'express';const OktaJwtVerifier = require('@okta/jwt-verifier');const oktaJwtVerifier = new OktaJwtVerifier({ clientId: '{YourClientId}', issuer: 'https://{yourOktaDomain}/oauth2/default'});export async function oktaAuth(req:Request, res:Response, next:NextFunction) { try { const token = (req as any).token; if (!token) { return res.status(401).send('Not Authorised'); } const jwt = await oktaJwtVerifier.verifyAccessToken(token); req.user = { uid: jwt.claims.uid, email: jwt.claims.sub }; next(); } catch (err) { return res.status(401).send(err.message); }}クライアントアプリケーションと同様に、
yourOktaDomainYourClientIdをアプリケーションのクライアントIDに置き換えなければなりません。oktaJwtVerifierインスタンスは、JWTトークンを受け取り、認証を行います。 認証に成功すると、ユーザーIDとEメールがreq.userserver.tsを作成します。import * as express from 'express';import * as cors from 'cors';import * as bodyParser from 'body-parser';const bearerToken = require('express-bearer-token');import {router as productRouter} from './product'import {oktaAuth} from './auth'const app = express() .use(cors()) .use(bodyParser.json()) .use(bearerToken()) .use(oktaAuth) .use(productRouter);app.listen(4201, (err) => { if (err) { return console.log(err); } return console.log('My Node App listening on port 4201');});TypeScriptをコンパイルするには、コマンドを実行します
npx tscその後、サーバーを起動したい場合は、単に実行します。
node dist/server.jsAngularクライアントを完成させる
さて、サーバーが完成したので、クライアントを完成させましょう。 最初のステップは、Productデータを格納するクラスを作成することです。 このクラスは、サーバーアプリケーションの
Productクラスと似ていますが、TypeORMアノテーションがありません。export class Product { id?: string; name: string; sku: string; description: string; price: number; stock: number;}このファイルは、
productsコンポーネントと同じディレクトリに保存します。 REST APIへのアクセスは、別のサービスにカプセル化しておくとよいでしょう。ng generate service products/Productsこれにより、
product.service.tssrc/app/productsディレクトリに作成されます。import { Injectable } from '@angular/core';import { HttpClient } from '@angular/common/http';import { OktaAuthService } from '@okta/okta-angular';import { Product } from './product';const baseUrl = 'http://localhost:4201';@Injectable({ providedIn: 'root'})export class ProductsService { constructor(public oktaAuth: OktaAuthService, private http: HttpClient) { } private async request(method: string, url: string, data?: any) { const token = await this.oktaAuth.getAccessToken(); console.log('request ' + JSON.stringify(data)); const result = this.http.request(method, url, { body: data, responseType: 'json', observe: 'body', headers: { Authorization: `Bearer ${token}` } }); return new Promise<any>((resolve, reject) => { result.subscribe(resolve as any, reject as any); }); } getProducts() { return this.request('get', `${baseUrl}/product`); } getProduct(id: string) { return this.request('get', `${baseUrl}/product/${id}`); } createProduct(product: Product) { console.log('createProduct ' + JSON.stringify(product)); return this.request('post', `${baseUrl}/product`, product); } updateProduct(product: Product) { console.log('updateProduct ' + JSON.stringify(product)); return this.request('post', `${baseUrl}/product/${product.id}`, product); } deleteProduct(id: string) { return this.request('delete', `${baseUrl}/product/${id}`); }}ProductsServiceには、REST APIの各ルートに対応するパブリックメソッドが1つずつ含まれています。 HTTP リクエストは、別のメソッドにカプセル化されます。 リクエストには、Bearerから取得したトークンが常に含まれていることに注意してください。これで
ProductsComponentを実装することができます。import { Component, OnInit } from '@angular/core';import { MatTableDataSource } from '@angular/material';import { ProductsService } from './products.service';import { Product } from './product';@Component({ selector: 'app-products', templateUrl: './products.component.html', styleUrls: })export class ProductsComponent implements OnInit { displayedColumns: string = ; dataSource = new MatTableDataSource<any>(); selectedProduct: Product = new Product(); loading = false; constructor(public productService: ProductsService) { } ngOnInit() { this.refresh(); } async refresh() { this.loading = true; const data = await this.productService.getProducts(); this.dataSource.data = data; this.loading = false; } async updateProduct() { if (this.selectedProduct.id !== undefined) { await this.productService.updateProduct(this.selectedProduct); } else { await this.productService.createProduct(this.selectedProduct); } this.selectedProduct = new Product(); await this.refresh(); } editProduct(product: Product) { this.selectedProduct = product; } clearProduct() { this.selectedProduct = new Product(); } async deleteProduct(product: Product) { this.loading = true; if (confirm(`Are you sure you want to delete the product ${product.name}. This cannot be undone.`)) { this.productService.deleteProduct(product.id); } await this.refresh(); }}商品を示す
products.component.htmlmat-tableコンポーネントを使用して、商品のリストを表示します。<h1 class="h1">Product Inventory</h1><div fxLayout="row" fxLayout.xs="column" fxLayoutAlign="space-between stretch" class="products"> <table mat-table fxFlex="100%" fxFlex.gt-sm="66%" ="dataSource" class="mat-elevation-z1"> <ng-container matColumnDef="name"> <th mat-header-cell *matHeaderCellDef> Name</th> <td mat-cell *matCellDef="let product"> {{product.name}}</td> </ng-container> <ng-container matColumnDef="sku"> <th mat-header-cell *matHeaderCellDef> SKU</th> <td mat-cell *matCellDef="let product"> {{product.sku}}</td> </ng-container> <ng-container matColumnDef="description"> <th mat-header-cell *matHeaderCellDef> Description</th> <td mat-cell *matCellDef="let product"> {{product.description}}</td> </ng-container> <ng-container matColumnDef="price"> <th mat-header-cell *matHeaderCellDef> Price</th> <td mat-cell *matCellDef="let product"> {{product.price}}</td> </ng-container> <ng-container matColumnDef="stock"> <th mat-header-cell *matHeaderCellDef> Stock Level</th> <td mat-cell *matCellDef="let product"> {{product.stock}}</td> </ng-container> <ng-container matColumnDef="edit"> <th mat-header-cell *matHeaderCellDef></th> <td mat-cell *matCellDef="let product"> <button mat-icon-button (click)="editProduct(product)"> <mat-icon>edit</mat-icon> </button> </td> </ng-container> <ng-container matColumnDef="delete"> <th mat-header-cell *matHeaderCellDef></th> <td mat-cell *matCellDef="let product"> <button mat-icon-button (click)="deleteProduct(product)"> <mat-icon>delete</mat-icon> </button> </td> </ng-container> <tr mat-header-row *matHeaderRowDef="displayedColumns"></tr> <tr mat-row *matRowDef="let row; columns: displayedColumns;"></tr> </table> <mat-divider fxShow="false" fxShow.gt-sm ="true"></mat-divider> <div> <h2>Selected Product</h2> <label>Name <input type="text" ="selectedProduct.name"> </label> <label>SKU <input type="text" ="selectedProduct.sku"> </label> <label>Description <input type="text" ="selectedProduct.description"> </label> <label>Price <input type="text" ="selectedProduct.price"> </label> <label>Stock Level <input type="text" ="selectedProduct.stock"> </label> <button mat-flat-button color="primary" (click)="updateProduct()">{{(selectedProduct.id!==undefined)?'Update':'Create'}}</button> <button mat-flat-button color="primary" (click)="clearProduct()">Clear</button> </div> <div class="loading" *ngIf="loading"> <mat-spinner></mat-spinner> </div></div>最後に、
products.component.cssのスタイリングをレイアウトに追加します。.products { padding: 2rem;}label, input { display: block;}label { margin-bottom: 1rem;}.loading { position: absolute; display: flex; justify-content: center; align-content: center; width: 100%; height: 100%; background-color: rgba(255, 255, 255, 0.8);}すべてが完了したら、クライアントとサーバーを起動して、アプリケーションをテストすることができます。 繰り返しになりますが、サーバーのあるディレクトリでは、次のように実行します。
node dist/server.jsそして、クライアントのディレクトリでは、次のように実行します。
ng serveあなたのアプリケーションは、次のようになっているはずです
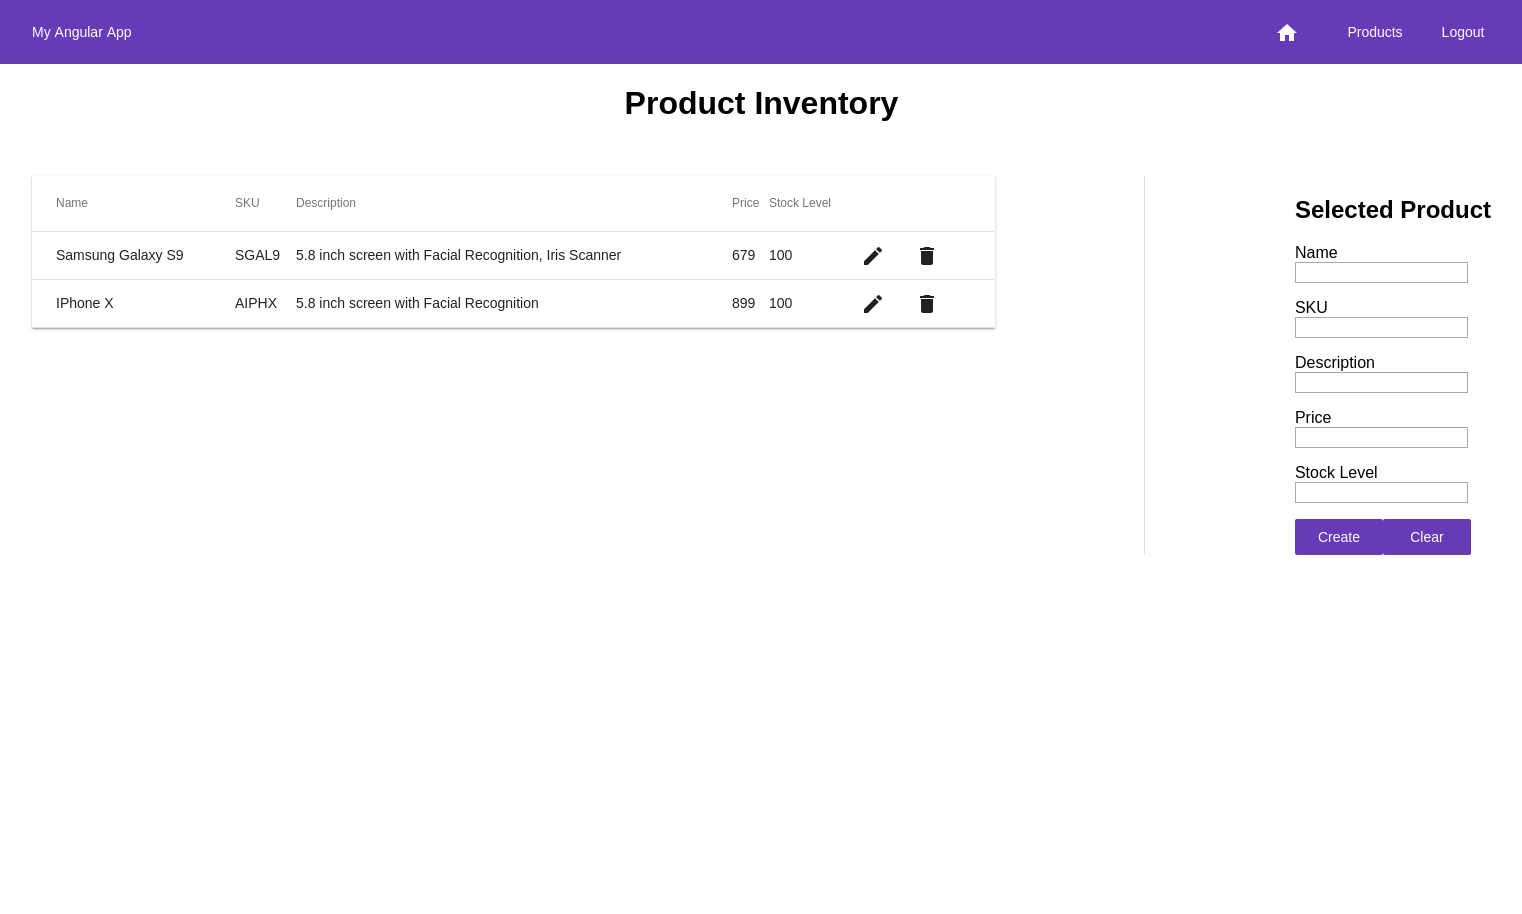
Learn more About Angular.Node and Express
Learn more About Angular, Node, and Express
このチュートリアルでは、AngularとNodeを使用したシングルページWebアプリケーションの開発をご紹介しました。 たった数行のコードで、クライアントとサーバーのユーザー認証を実装することができました。 Angularでは、JavaScript言語のスーパーセットであり、型情報を追加するTypeScriptを使用しています。 TypeScriptはより安定したコードを作ることができるので、Node/Expressサーバもこの言語を使って実装することにしました。 まだTypeScriptに慣れていない方は、Todd Motto氏による素晴らしい紹介記事をご覧ください。
このチュートリアルの完全なコードは、GitHubで見ることができます。
もしAngularやNode/Expressについてもっと知りたいと思ったら、他のリソースをチェックしてみましょう:
- Simple Node Authentication
- Build a Basic CRUD App with Node and React
- Build a Simple API Service with Express and GraphQL
- Angular 6 – What’s New and Why Upgrade?
- Build a Basic CRUD App with Angular 7 and Spring Boot
そしていつものように、私たちのチームからのクールなコンテンツや最新情報を得るために、私たちをフォローしていただけると嬉しいです。 Twitter @oktadev、Facebook、LinkedInでご覧いただけます。